使用uWSGI与Nginx部署Django项目
AI摘要Kimi Chat
Django项目在本地开发完成后,我们还需要将它部署到服务器上,以使得大家都能访问。这里我选择使用uWSGI和Nginx来提供web服务。
主要软硬件依赖
- 系统:Ubuntu18.04,1核CPU,2G内存,40G系统盘,5Mbps峰值带宽
- Python3.6
- uWSGI 2.0.19.1 (处理动态请求)
- Nginx 1.14.0 (处理静态文件)
当然以上版本只是个参考(并且已经部署成功了),可以视具体情况变动。
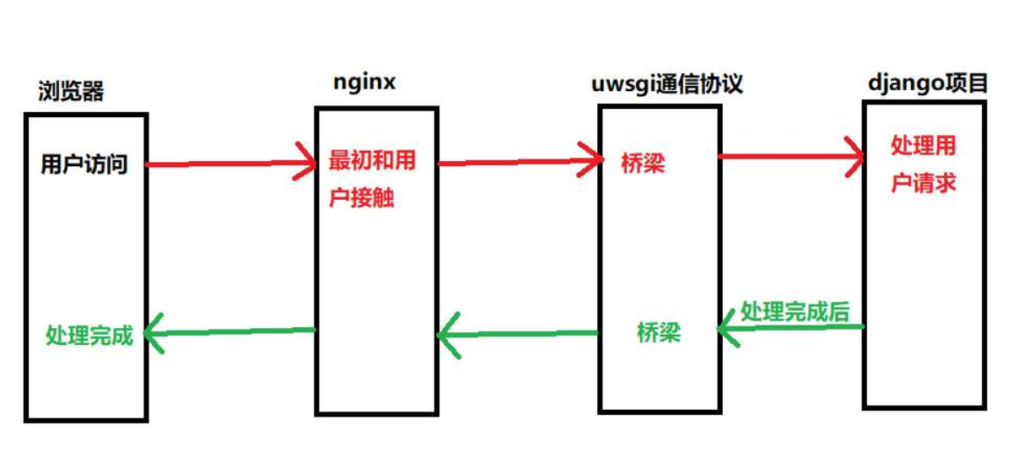
uWSGI、Nginx、django项目与客户端的交互过程如下图所示:
安装软件
安装python3.6
我的Ubuntu镜像自带3.6版本的python,否则需要手动安装,可以参考这个链接
安装pip3
sudo apt install python3-pip安装Django项目的依赖库
可以一个一个用pip3命令安装,也可以简单粗暴一点,用requirements.txt快速安装:
# 进入你的django项目根目录
cd /path/to/django/project
pip3 freeze > requirements.txt
pip3 install -r requirements.txt
安装uWSGI
pip3 install uwsgi安装Nginx
apt install nginx配置uWSGI
# 在你的django根目录下创建uwsgi的配置文件并打开
vi uwsgi.ini
# 写入下面内容[uwsgi]
socket = 127.0.0.1:3400 # 以本地3400端口为例
# Django-related settings
# the django project directory (full path)
chdir = /path/to/django/project # 你的项目根目录绝对路径
# Django's wsgi file
module = xxxx.wsgi # 指定使用的wsgi模块(django应该会自己生成)
# process-related settings
# master
master = true
# maximum number of worker processes
processes = 2
threads = 2
max-requests = 6000
# ... with appropriate permissions - may be needed
chmod-socket = 664
# clear environment on exit
vacuum = true
daemonize = /path/to/django/project/uwsgi.log # 指定uwsgi日志文件的位置,一般就放项目根目录下# 启动uwsgi
uwsgi --ini uwsgi.ini配置Nginx
# 在项目根目录下创建Nginx的配置文件并打开,写入以下内容,并按注释修改一些基本配置
vi /path/to/django/project/nginx.conf
server {
# the port your site will be served on
listen 8080;
# the domain name it will serve for
server_name xxxx; # substitute your machine's IP address or FQDN
charset utf-8;
access_log /path/to/django/project/access_log;
error_log /path/to/django/project/error_log;
# max upload size
client_max_body_size 75M; # adjust to taste
# Django media
#location /media {
# alias /to/your/mysite/media; # your Django project's media files - amend as required
#}
location /static {
alias /path/to/django/project/static; # your Django project's static files - amend as required
}
# Finally, send all non-media requests to the Django server.
location / {
uwsgi_pass 127.0.0.1:3400;
include /etc/nginx/uwsgi_params; # the uwsgi_params file you installed
}
}以上文件主要修改的有:
listen项(外部直接访问网站时的端口,别用6666-6669端口,会被浏览器禁)server_name项(服务器的ip地址或已备案的域名)access_log与error_log项(Nginx的日志文件)location /static下的alias后面的路径改为你项目的static目录的绝对路径location /下的uwsgi_pass后面改为之前uwsgi.ini中的socket值
# 在 /etc/nginx/sites-enabled 目录下建立上面配置的nginx.conf的软连接
sudo ln -s nginx.conf /etc/nginx/sites-enabled
# 删掉 /etc/nginx/sites-enabled 下的default文件
sudo rm -rf /etc/nginx/sites-enabled/default
# 重启nginx
sudo systemctl restart nginx接下来在浏览器中访问<ip>:<port>即可,阿里云的服务器需要预先打开该端口。
本博客所有文章除特别声明外,均采用 CC BY-NC-SA 4.0 许可协议。转载请注明来自 逸风亭!
 V me 50!
- Alipay is also ok~


相关推荐

评论
TwikooGiscus